The heat press has become a must-have tool for designers, small business owners, and hobbyists looking to create high-quality custom apparel. It uses a combination of heat and pressure to transfer designs onto various materials, resulting in long-lasting and professional finishes. Whether you want to personalize t-shirts, tote bags, or caps, a heat press helps you achieve smooth and durable prints. This technology has grown in popularity because it provides consistent results that rival those from large printing factories. One variation that has gained attention among creators is the hat heat press, specifically designed to transfer designs onto curved surfaces like caps and visors with perfect alignment and precision.
Understanding How a Heat Press Works
At its core, a heat press uses temperature and pressure to transfer graphics from transfer paper or film onto a surface such as fabric, ceramic, or metal. The process begins when you print your desired design using heat transfer vinyl, sublimation paper, or other compatible materials. You then position the design on the item, close the heat press, and allow it to apply heat for a specific duration. The combination of time, temperature, and pressure causes the ink or vinyl to bond permanently with the substrate, creating a professional, long-lasting result. Unlike an iron, which delivers inconsistent heat, a heat press offers uniform coverage that ensures every part of the design adheres evenly.
Exploring the Hat Heat Press
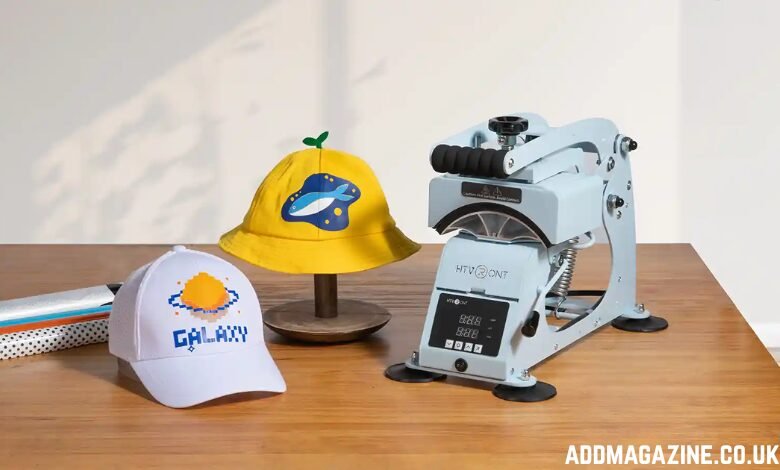
For anyone creating custom hats, the hat heat press is an essential addition to your equipment. Traditional flat presses cannot apply consistent pressure to curved surfaces, often leading to imperfect transfers or peeling designs. The hat heat press, however, is built with a curved platen that fits the natural shape of caps. It holds the hat firmly in place, allowing even heat distribution for precise results. This specialized design makes it perfect for sports caps, trucker hats, and other headwear. Using a hat heat press also gives creators more control over positioning and design placement, which is especially important for detailed logos or small text that must align perfectly with seams or curves.
Benefits of Using a Heat Press and Hat Heat Press
One of the biggest advantages of owning a heat press and hat heat press is versatility. With these machines, you can create a wide range of customized items, from t-shirts and hoodies to hats and accessories. They are also cost-effective compared to outsourcing your printing work. Once you learn the proper settings, you can produce professional-quality items in minutes without needing large-scale machinery. Another major benefit is durability. Transfers made with a heat press resist fading, peeling, and cracking even after multiple washes. Additionally, these machines are compact and user-friendly, making them suitable for both beginners and experienced creators.
Setting Up for Success
Before using your heat press, it’s essential to prepare your materials properly. Make sure the surface is clean and free from dust or wrinkles. Set the right temperature based on the material type and the transfer medium you are using. Cotton fabrics, for example, often require a higher temperature than polyester blends. Pre-pressing the material for a few seconds helps remove moisture and create a smoother surface for better adhesion. When working with a hat heat press, ensure the cap is tightly secured around the platen. A firm hold prevents shifting during pressing and ensures that the design adheres evenly across the curved surface. Once pressed, allow the item to cool before peeling off the transfer film to reveal your final design.
Tips for Best Results
Achieving professional results with your heat press depends on attention to detail. Always follow recommended time and temperature settings, as overheating can scorch the fabric while underheating may lead to poor adhesion. Test your setup on scrap material before pressing the final product. For the hat heat press, use a Teflon sheet or parchment paper to protect both the platen and your design from direct contact with heat. Consistent pressure is key to even results, so make sure to adjust your machine’s pressure knobs according to the thickness of the material.
Creative Uses for the Heat Press and Hat Heat Press
These machines open a world of creative possibilities. A standard heat press can be used for customizing shirts, tote bags, pillowcases, and even ceramic tiles. With a hat heat press, you can produce custom headwear for sports teams, corporate promotions, or fashion brands. Many small business owners use both machines to offer complete merchandise packages that include matching t-shirts and caps. This combination helps them stand out in a competitive market while maintaining high production quality. You can also experiment with layered vinyl designs, glitter effects, and multi-color transfers to make each piece unique.
Maintenance and Longevity
Maintaining your heat press and hat heat press ensures consistent performance over time. Clean the platen regularly with a soft cloth to remove adhesive residue. Avoid using sharp tools that could damage the surface. Check electrical connections and heat settings periodically to ensure safe operation. Storing your machine in a dry, dust-free environment will prevent rust and other damage. By treating your equipment with care, you can extend its lifespan and avoid costly repairs.
FAQs
What materials can I use with a heat press and hat heat press?
You can use a variety of fabrics, including cotton, polyester, blends, and even some synthetic materials. The hat heat press works best with structured caps that can handle heat and pressure.
How do I choose the right temperature for pressing?
Temperature depends on the transfer type and material. For most vinyl transfers, settings range between 300°F and 320°F, but it’s always best to check manufacturer recommendations.
Is it easy to use a hat heat press for beginners?
Yes, the hat heat press is designed for simplicity. Once you learn how to position the cap and adjust pressure, you’ll be able to create professional-quality designs with minimal practice.
Can I use the same designs on shirts and hats?
Absolutely. You can resize your designs to fit different surfaces. Many creators use the same logo or artwork across various products for brand consistency.
How long do designs made with a heat press last?
When properly applied, designs can last for years without fading or peeling, even after multiple washes. The key is using the right temperature, pressure, and quality transfer materials.
Conclusion
The heat press and hat heat press together form the backbone of modern custom printing. They offer creators a reliable, affordable, and efficient way to bring designs to life on a variety of materials. The heat press provides even and powerful transfers on flat items, while the hat heat press extends this capability to curved surfaces with flawless precision. Whether you’re starting a small business or exploring creative hobbies, mastering these machines can open new opportunities in the world of personalized fashion and branding. By understanding how they work, following correct procedures, and maintaining your equipment, you can ensure every print turns out professional and long-lasting. With a bit of practice and creativity, these tools can transform your design ideas into stunning, tangible creations that make a lasting impression on your customers and community.


